THE MAKING OF

THIS BLOG IS CONTRIBUTED TO THE PROCESS OF MAKING MY FINAL MAJOR PROJECT

Friday 20 April 2012

Male Character: COSTUME

Making process of the male costume is very similar to the process of making the male mask: soaked sheep leather is moulded directly on the plaster life cast (in this case torso). I make the costume in relation to mask, and for that reason the mask needs to be present durig the process.


When the piece is dry, it is time for fittings and adjustments. As much as I can do working with the life casts of my models, I still need to work with the person to make sure that the costumes fit and models are comfortable and able to move.


Once the piece is ready, I'm making a paper patterns for a 'tattoo-sleeve', which are later cut out from leather and fixed together using Evo Stik. It is important to do the final fitting before bonding the leather.


Below finished (painted and 'aged') top piece with sleeve attached.


Trousers are the bottom part of the male costume. I have decided to buy a leather/suede trousers (cheaply from a second hand shop) and alter them to match the rest of the costume and the character in general.
For that I'm using a talcum powder (fade & rub off effect) and pure latex (shine and 'aged' effect).


Finished piece


Friday 13 April 2012

Male Character: MASK

Just like for the female character's costume, I took a life cast of the male character - full head and torso.


Starting with the mask, I moulded the leather on top of the head cast. I didn't sculpt the shapes prior like I did with the female mask. I'm still using the sheep leather, and to fix the shapes and creases I simply dried them with the hair dryer. Then I worked out the pattern for the fastening straps.


Once the straps are measured and cut, I fix them with small belt buckles. For this I need to use a hole puncher and a 3mm double head rivet. It is very important to choose the right size puncher and rivets: if the hole is too large the rivet will come out - especially from a stretchy leather just like the one I'm using. The rivets should be chosen not only for their head size, but also for the lenght of the stem which should match the thickness of the leather pieces that will be fixed together.


To make the straps look neat, and matching the rest of the mask, i soaked the edges with water and roll them up and back. Sometimes, if the leather is thick, it is good to trim the edges with a surgical blade and then shaped. When dried, the rolled up edges can be glued for a permanent fix.


Completed male mask below


When ready, the mask needs to be painted and the leather 'aged'. I tested the Fiebing's Leather Dye in advance, so now I have some thinned dye which I'm going to apply little by little to add various shades and dimension. Although the dye and thinner are alcohol based, it has to be remembered that their first apearance on the leather surface is darker because of the moist. Once the alcohol evaporates (and that is within minutes) the colour will become lighter and ready for the next application if required. It is best to work with lighter colour and keep adding it gradually than use stronger one, as it will be impossible to remove it. To apply facial stubble (in character) I use an irregular piece of reticulated foam and pure unthinned dye. To 'age ' the leather I use various tools and materials: metal dish scrubber (for a harsh treatment) and a ball of tiul (for a milder treatment) to rub off previously dyed leather, and a hair wax to add some shine and 'age'. I found  the hair wax very useful because it is nicely absorbed by the leather without leaving a grease-film on the surface, and it can be applied repeatedly if neaded gradually darkening the leather. The wax must be applied AFTER the colouring, otherwise it will prevent the dye from sinking into the leather.


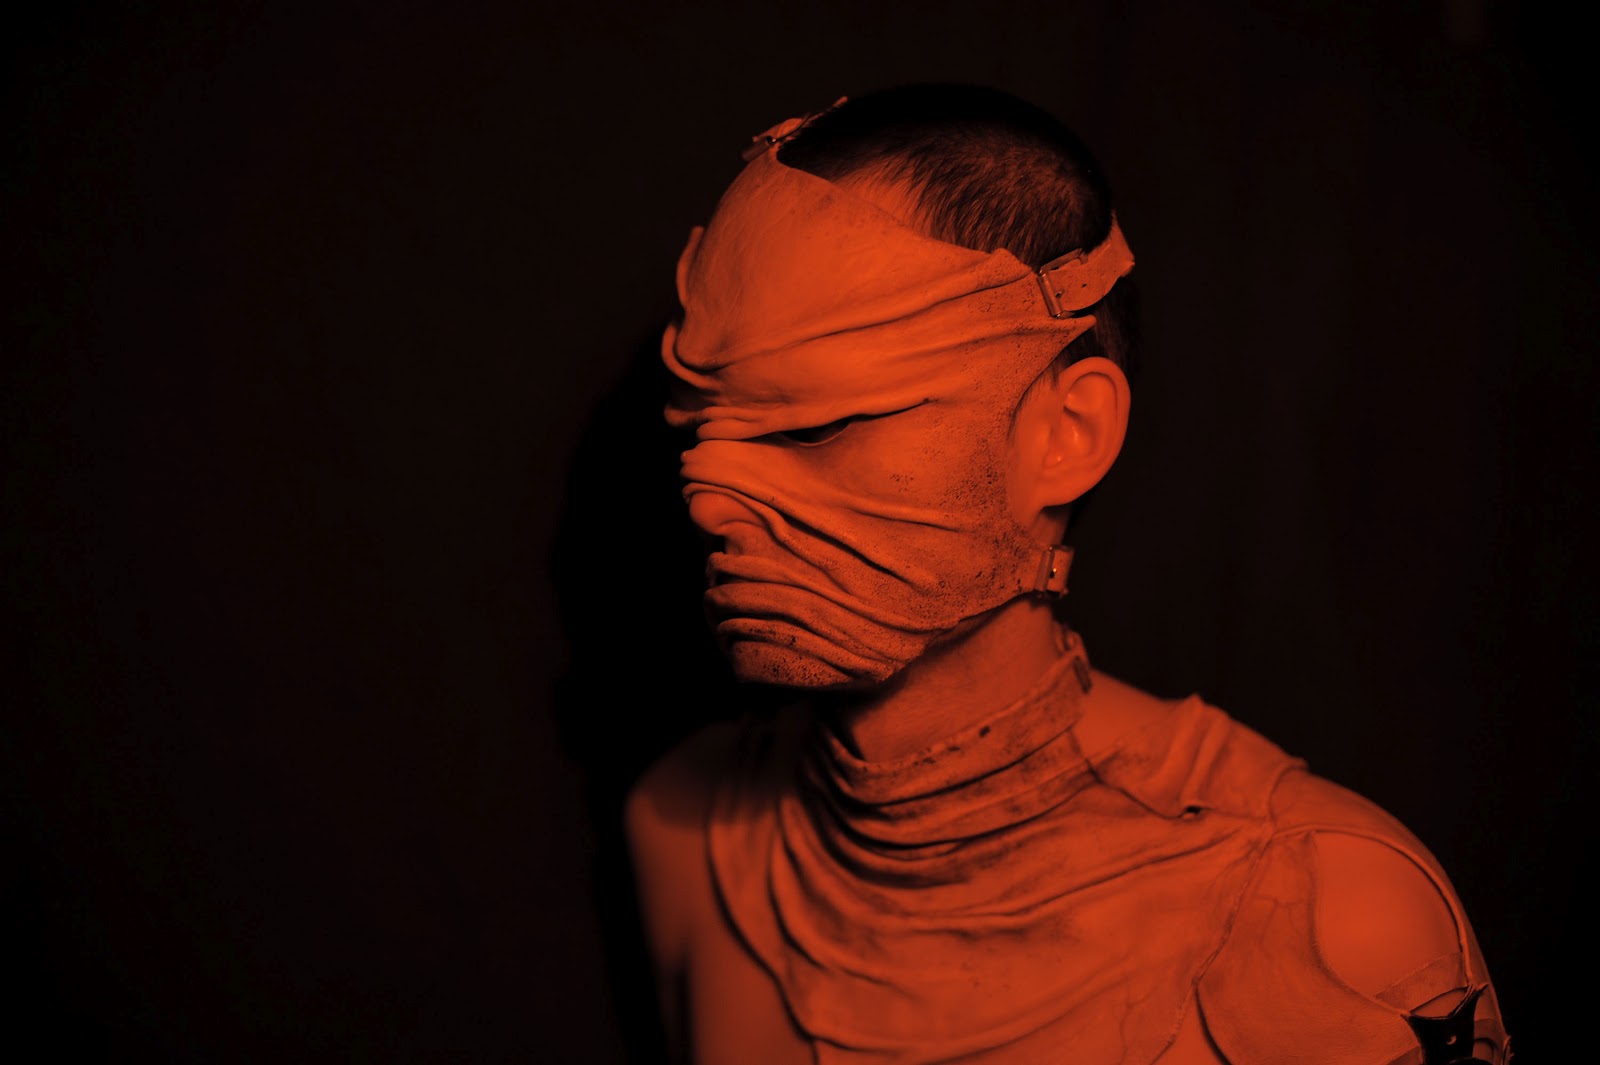
Finished mask on the performer


and during the light tests


Thursday 12 April 2012

Female Character: COSTUME - BREASTS

  Using a water based clay I sculpted the breasts on top of my body cast. An alginate cast of my model's     breast served me as a reference point.


 Final sculpt of the breasts ready for fibre glass moulding.


 I made a one part fibre glass mould into which I moulded the leather. I used a small bone folder to get into the narrow shapes of the veins.


  Once the leather breasts are ready, I'm starting to make a pattern for the top-part of female costume.


 The pattern is tranfered on to the leather and cut out. Next it is soaked in warm water and moulded on top of the plaster body cast. When the main piece is formed and dry, both breast pieces are bonded on to it with Evo Stik. The size of the leather breasts is bigger (pregnancy swelling) than the naturalal size of model's breasts, so make sure that the 'bra' is comfortable and looking good (and natural) on the model, I padded the breasts with a sponge-soft foam.


Once the fasteners and buckel are fixed, it is time to 'wear down' the leather. Just like for the mask, I used thinned leather dye, self-made tools to rub off the colour, and hair wax to polish the leather.


Finished piece on the performer (with the neck piece and the mask):


Female Character: NECK PIECE

A piece of sheep leather was soaked in warm water ready to mould. I placed it on top of my model's head cast and shape it around the neck, jaw line, and in relation to the mask - that's because the neck piece will be attached to the mask.

I'm moulding the leather with my own fingers (the best toosl ever!). But I'm using a surgical blade and a pair of small scissors to cut the right shape. When the piece is shaped and dry, I will attach the straps and fasteners.
This is how the finished  neck piece looks like in relation to the mask and the costume.


The last step is to finish it off by 'wearing down' the leather. This will be done in the same way as the mask and the rest od the costume...