Ever since my childhood, I have been fascinated with horror films and
speciall effects which make them so appealing. I adore the horribly
beautiful and truly inspirational works of artists such as Tom Savini,
Rick Baker, and Bob Keen. For some reason this theme has followed me
throughout my adult life, and in consequence led to the full time study
of Technical Effects for Performance. Taking a maximum advantage of the
course, I'm trying now to
make my way, step by step, into the world of special effects and
prosthetics for the film industry.
To view my professional portfolio of work go to:
http://www.wix.com/merkova/portfolio
...........................................................
Monday, 14 May 2012


Tuesday, 1 May 2012
The Prop
The prop is a 13 weeks old human fetus. Before sculpting I gathered photo references to learn about the size, proportions, and colours. Having the measurements, I made a wire armature and sculpted the fetus is shavant. The fetus was sculpted with its arms spread, as later it is going to be attached to the crucifix.
On the pictures below is final sculpt during the preparation for moulding in fibre glass (the sculpt is 'walled' with clay, sprayed over with J-Wax, and brushed lightly with talcum powder).


Two-part fibre glass mould of human fetus: finished and ready for casting.

I applied a couple of layers of a pale flesh-tone latex on to my mould. In meantime I bent two pieces of cotton covered wire (to fit the arms and the legs) and sank them in to the latex. I used the wire in order to stiffen the very thin arms and legs. Because the J-foam (which will be used to fill up the inside of my prop) may not spread beyond the elbows and knees, I fill these parts with latex and small pieces of sponge-foam.
When the latex is dry, I apply another thin layer on to the parts which will bond together after the mould is closed. After closing the mould and screwing tightly together, I leave it for a couple of hours to let the latex dry. And because there are bleeding holes in my mould, I know latex will dry properly instead of 'sweating'.
Finally I pour J-foam inside the mould and leave it to cure. I'm using J-foam 162, mixing ratio 2:1 by weight to produce a fairly soft foam (to make sure that the cast can be removed from the mould easily).


Because this prop is for a life performance, I need to make two crucifixes: one on its own for the early scenes and one with the fatus attachel for the later scene. When the crosses are ready, the prop is painted with Skin Illustrator and attached to one of them.


Finished piece:

Friday, 20 April 2012
Male Character: COSTUME
Making process of the male costume is very similar to the process of making the male mask: soaked sheep leather is moulded directly on the plaster life cast (in this case torso). I make the costume in relation to mask, and for that reason the mask needs to be present durig the process.

When the piece is dry, it is time for fittings and adjustments. As much as I can do working with the life casts of my models, I still need to work with the person to make sure that the costumes fit and models are comfortable and able to move.


Once the piece is ready, I'm making a paper patterns for a 'tattoo-sleeve', which are later cut out from leather and fixed together using Evo Stik. It is important to do the final fitting before bonding the leather.

Below finished (painted and 'aged') top piece with sleeve attached.


Trousers are the bottom part of the male costume. I have decided to buy a leather/suede trousers (cheaply from a second hand shop) and alter them to match the rest of the costume and the character in general.
For that I'm using a talcum powder (fade & rub off effect) and pure latex (shine and 'aged' effect).

Finished piece


When the piece is dry, it is time for fittings and adjustments. As much as I can do working with the life casts of my models, I still need to work with the person to make sure that the costumes fit and models are comfortable and able to move.


Once the piece is ready, I'm making a paper patterns for a 'tattoo-sleeve', which are later cut out from leather and fixed together using Evo Stik. It is important to do the final fitting before bonding the leather.

Below finished (painted and 'aged') top piece with sleeve attached.


Trousers are the bottom part of the male costume. I have decided to buy a leather/suede trousers (cheaply from a second hand shop) and alter them to match the rest of the costume and the character in general.
For that I'm using a talcum powder (fade & rub off effect) and pure latex (shine and 'aged' effect).

Finished piece


Friday, 13 April 2012
Male Character: MASK
Just like for the female character's costume, I took a life cast of the male character - full head and torso.

Starting with the mask, I moulded the leather on top of the head cast. I didn't sculpt the shapes prior like I did with the female mask. I'm still using the sheep leather, and to fix the shapes and creases I simply dried them with the hair dryer. Then I worked out the pattern for the fastening straps.


Once the straps are measured and cut, I fix them with small belt buckles. For this I need to use a hole puncher and a 3mm double head rivet. It is very important to choose the right size puncher and rivets: if the hole is too large the rivet will come out - especially from a stretchy leather just like the one I'm using. The rivets should be chosen not only for their head size, but also for the lenght of the stem which should match the thickness of the leather pieces that will be fixed together.

To make the straps look neat, and matching the rest of the mask, i soaked the edges with water and roll them up and back. Sometimes, if the leather is thick, it is good to trim the edges with a surgical blade and then shaped. When dried, the rolled up edges can be glued for a permanent fix.


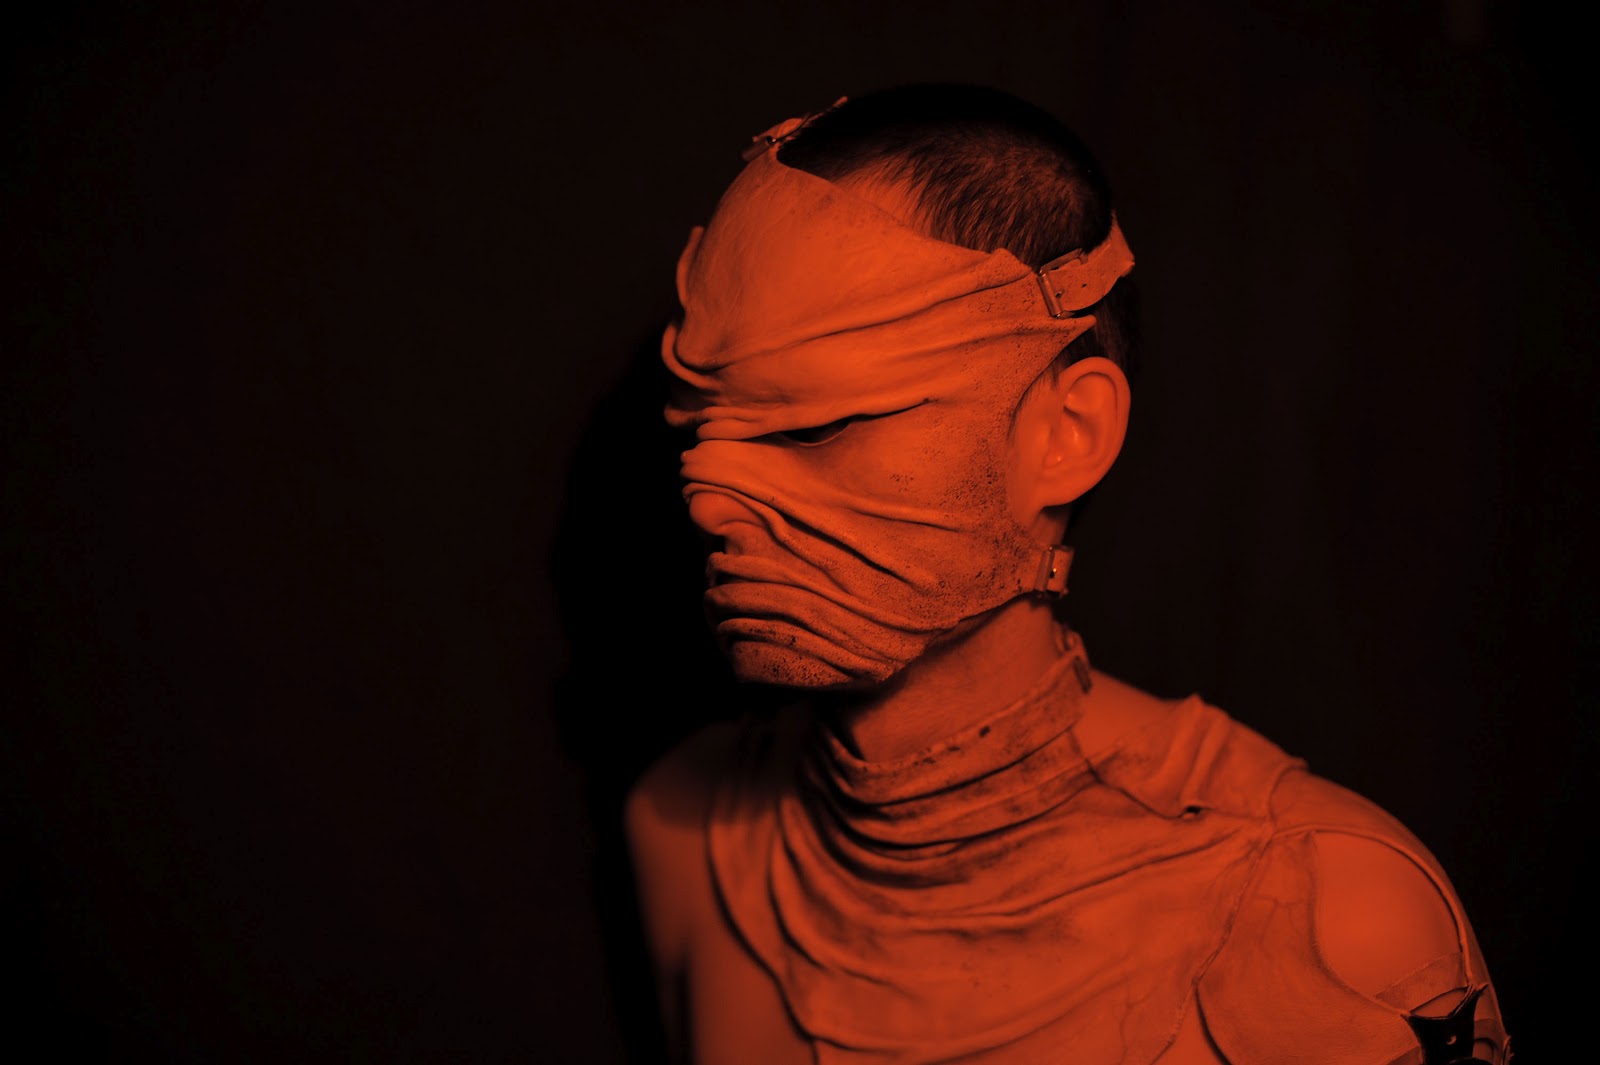
Finished mask on the performer

and during the light tests


Starting with the mask, I moulded the leather on top of the head cast. I didn't sculpt the shapes prior like I did with the female mask. I'm still using the sheep leather, and to fix the shapes and creases I simply dried them with the hair dryer. Then I worked out the pattern for the fastening straps.


Once the straps are measured and cut, I fix them with small belt buckles. For this I need to use a hole puncher and a 3mm double head rivet. It is very important to choose the right size puncher and rivets: if the hole is too large the rivet will come out - especially from a stretchy leather just like the one I'm using. The rivets should be chosen not only for their head size, but also for the lenght of the stem which should match the thickness of the leather pieces that will be fixed together.

To make the straps look neat, and matching the rest of the mask, i soaked the edges with water and roll them up and back. Sometimes, if the leather is thick, it is good to trim the edges with a surgical blade and then shaped. When dried, the rolled up edges can be glued for a permanent fix.
Completed male mask below


When ready, the mask needs to be painted and the leather 'aged'. I tested the Fiebing's Leather Dye in advance, so now I have some thinned dye which I'm going to apply little by little to add various shades and dimension. Although the dye and thinner are alcohol based, it has to be remembered that their first apearance on the leather surface is darker because of the moist. Once the alcohol evaporates (and that is within minutes) the colour will become lighter and ready for the next application if required. It is best to work with lighter colour and keep adding it gradually than use stronger one, as it will be impossible to remove it. To apply facial stubble (in character) I use an irregular piece of reticulated foam and pure unthinned dye. To 'age ' the leather I use various tools and materials: metal dish scrubber (for a harsh treatment) and a ball of tiul (for a milder treatment) to rub off previously dyed leather, and a hair wax to add some shine and 'age'. I found the hair wax very useful because it is nicely absorbed by the leather without leaving a grease-film on the surface, and it can be applied repeatedly if neaded gradually darkening the leather. The wax must be applied AFTER the colouring, otherwise it will prevent the dye from sinking into the leather.

Finished mask on the performer

and during the light tests

Thursday, 12 April 2012
Female Character: COSTUME - BREASTS

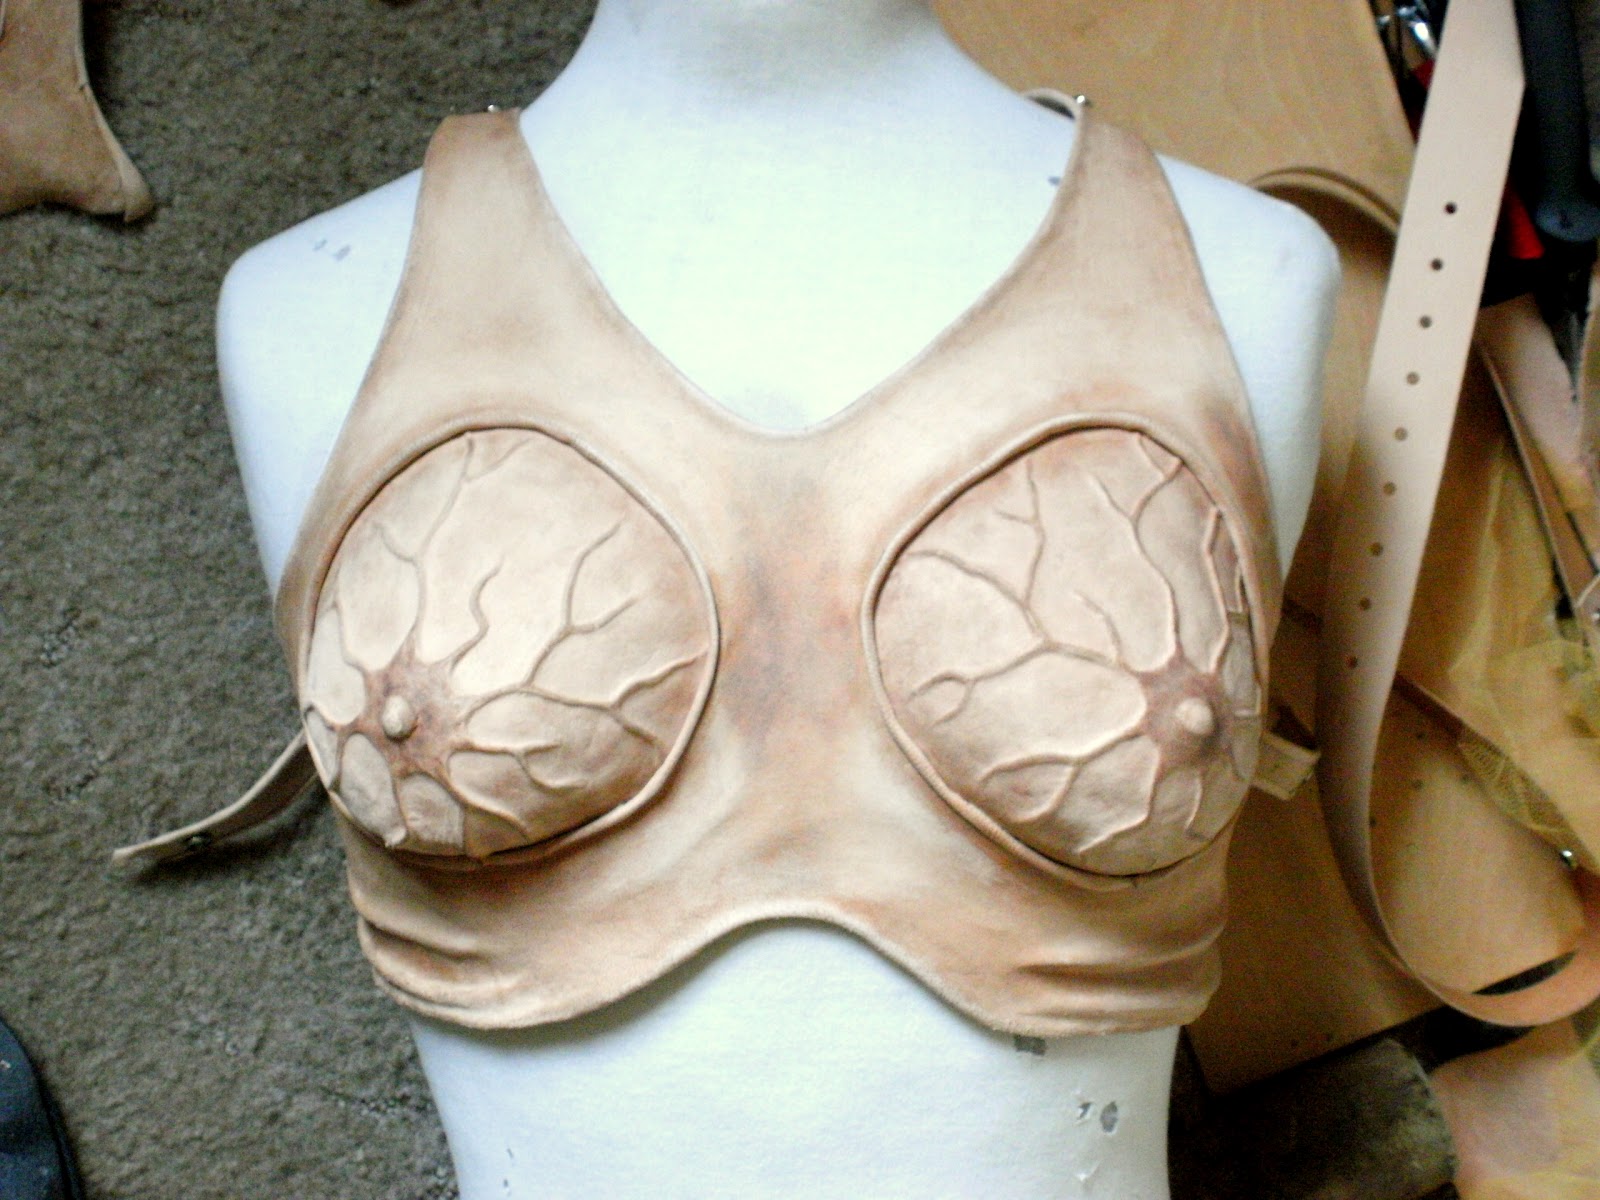
Final sculpt of the breasts ready for fibre glass moulding.

I made a one part fibre glass mould into which I moulded the leather. I used a small bone folder to get into the narrow shapes of the veins.

Once the leather breasts are ready, I'm starting to make a pattern for the top-part of female costume.

The pattern is tranfered on to the leather and cut out. Next it is soaked in warm water and moulded on top of the plaster body cast. When the main piece is formed and dry, both breast pieces are bonded on to it with Evo Stik. The size of the leather breasts is bigger (pregnancy swelling) than the naturalal size of model's breasts, so make sure that the 'bra' is comfortable and looking good (and natural) on the model, I padded the breasts with a sponge-soft foam.


Once the fasteners and buckel are fixed, it is time to 'wear down' the leather. Just like for the mask, I used thinned leather dye, self-made tools to rub off the colour, and hair wax to polish the leather.
Finished piece on the performer (with the neck piece and the mask):


Female Character: NECK PIECE
A piece of sheep leather was soaked in warm water ready to mould. I placed it on top of my model's head cast and shape it around the neck, jaw line, and in relation to the mask - that's because the neck piece will be attached to the mask.
 I'm moulding the leather with my own fingers (the best toosl ever!). But I'm using a surgical blade and a pair of small scissors to cut the right shape. When the piece is shaped and dry, I will attach the straps and fasteners.
This is how the finished neck piece looks like in relation to the mask and the costume.


The last step is to finish it off by 'wearing down' the leather. This will be done in the same way as the mask and the rest od the costume...


This is how the finished neck piece looks like in relation to the mask and the costume.


The last step is to finish it off by 'wearing down' the leather. This will be done in the same way as the mask and the rest od the costume...

Saturday, 31 March 2012
Female Character: COSTUME - PREGNANT BELLY
On top of the abdomen part of my body cast, I sculpted a face of a crying baby using a water based clay (for fast sculpting). The baby's face is about the size of a 13-week pregnant belly, and its facial expression symbolises the fear of death (terminating the pregnancy which is going to happen).

Next I made a one-part fibre glass mould of the sculpt. Because the gel coat doesn't set properly when in contact with moisture, it is important to make sure that the water based clay id fairly dry (but not too dry so it doesn't crack). Also, a few layers of J-wax or Bees wax need to be applied in order to keep the moisture separated and for an easy release afterwards. Using only a couple of layers of a fibre glass matt, I made my mould fairly thin as there will be no tension or force applied.

Because previously I covered my casts with thin layer of PVC it is now very easy to remove from its surface any access clay or resin.After the edges of my mould are trimmed and sanded, it is time to test the materials in which the final cast will be made.

Below two test casts made from make up gelatine (left) and latex (right). I discovered that the latex is stronger and stretches better than the gelatine, but it is a little tricky in terms of colouring because of its naturaly yellowish shade. The gelatine colours easily, but has very short working time and is quite fragile. For this reson I chose to use latex.

In the meantime I made the patterns and cut them out from leather. I will be using D-rings as a 'holders' because they nicely adapt the belts in relation to the main piece and the model's body.

A velcro is glued onto the back side of the main piece as well as the 'back wall'. The latex baby face is fixed around with the net pieces (tiul) which, when placed between the velcro, holds the latex firmly in position.


And this is how the pregnant belly piece looks on the model.


Having the main piece ready, I need to make the final cast of baby's face. I have done many tests with coloured latex, and chose to make it in pale flesh tone and paint it with the mix of Pros Aid and acrylics.
I'm using Pros Aid to make sure that the layers of colour will be as stretchy as latex (let's remember that the latex will be pulled and stretched during the performance).

Once the belly piece is completed it is time to make it match the rest of the costume (the same process of 'ageing' and 'wearing down' the leather as with the mask, neck piece, and the bra). Also the fasteners, rivets, and buckles are mattified and aged with thinned nail varnish (I used the 'French' mexed with brown).


Finished piece on the model

and during light tests

...

Next I made a one-part fibre glass mould of the sculpt. Because the gel coat doesn't set properly when in contact with moisture, it is important to make sure that the water based clay id fairly dry (but not too dry so it doesn't crack). Also, a few layers of J-wax or Bees wax need to be applied in order to keep the moisture separated and for an easy release afterwards. Using only a couple of layers of a fibre glass matt, I made my mould fairly thin as there will be no tension or force applied.

Because previously I covered my casts with thin layer of PVC it is now very easy to remove from its surface any access clay or resin.After the edges of my mould are trimmed and sanded, it is time to test the materials in which the final cast will be made.

Below two test casts made from make up gelatine (left) and latex (right). I discovered that the latex is stronger and stretches better than the gelatine, but it is a little tricky in terms of colouring because of its naturaly yellowish shade. The gelatine colours easily, but has very short working time and is quite fragile. For this reson I chose to use latex.

In the meantime I made the patterns and cut them out from leather. I will be using D-rings as a 'holders' because they nicely adapt the belts in relation to the main piece and the model's body.

A velcro is glued onto the back side of the main piece as well as the 'back wall'. The latex baby face is fixed around with the net pieces (tiul) which, when placed between the velcro, holds the latex firmly in position.


I'm using Pros Aid to make sure that the layers of colour will be as stretchy as latex (let's remember that the latex will be pulled and stretched during the performance).

Once the belly piece is completed it is time to make it match the rest of the costume (the same process of 'ageing' and 'wearing down' the leather as with the mask, neck piece, and the bra). Also the fasteners, rivets, and buckles are mattified and aged with thinned nail varnish (I used the 'French' mexed with brown).


Finished piece on the model

and during light tests

...
Subscribe to:
Posts (Atom)